How to configure custom MIME type in cPanel is an important task for web administrators who want to control how their web server processes specific file formats. MIME (Multipurpose Internet Mail Extensions) types tell browsers how to handle different kinds of files such as text, images, audio, and video. Customizing MIME types allows you to optimize how your content is delivered and displayed.
In this detailed tutorial, we will guide you through the steps to configure custom MIME types in cPanel, explain why it’s essential, and provide best practices to ensure smooth implementation.
What are MIME Types?
MIME types are identifiers that tell web browsers how to process different file formats. For example:
text/htmlfor HTML filesimage/jpegfor JPEG imagesapplication/jsonfor JSON data
Without correct MIME types, browsers may not display or process files correctly, leading to broken content or download prompts.
Why Configure Custom MIME Types?
There are several reasons you might need to configure custom MIME types:
- Support New File Formats: For proprietary or uncommon file types.
- Optimize Performance: Ensure files are interpreted and displayed correctly by browsers.
- Enhance Compatibility: Work with specific applications that require custom MIME recognition.
- Prevent Errors: Avoid browser warnings or failed file loads.
How to Configure Custom MIME Type in cPanel
Setting up custom MIME types in cPanel is a straightforward process. Follow the steps below carefully.
Step 1: Log into Your cPanel Account
Begin by accessing your cPanel account provided by your hosting provider. If you’re using Hostrago, go to Login in cPanel.
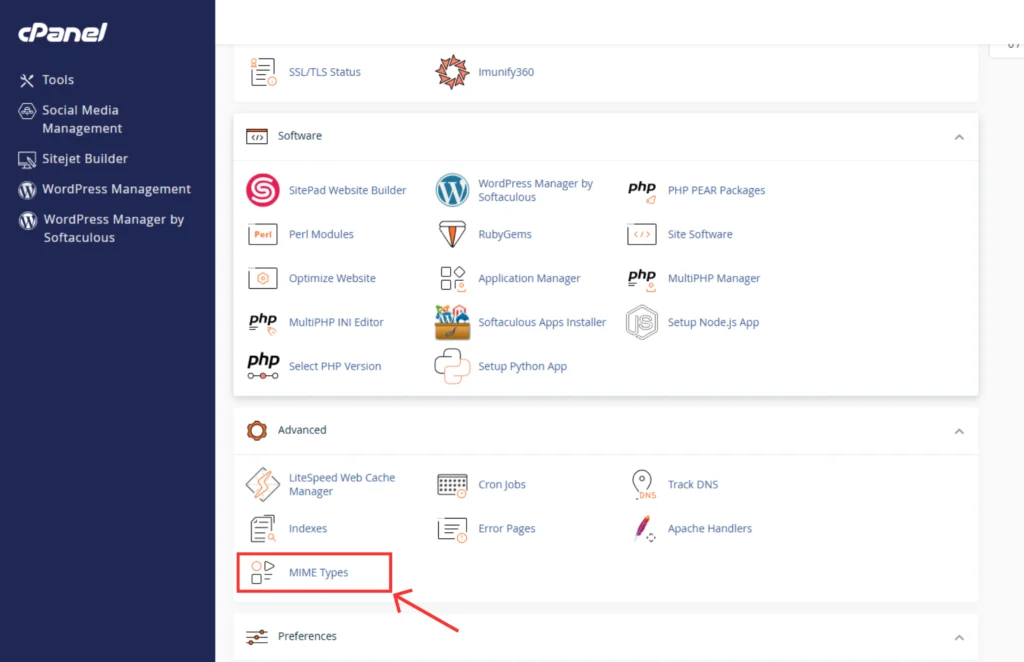
Step 2: Open the MIME Types Interface
- Once logged into cPanel, scroll to the “Advanced” section.
- Click on “MIME Types.”
Step 3: Add a New MIME Type
- In the MIME Type field, enter the appropriate MIME type. For example:
application/x-customformat - In the Extension(s) field, type the file extensions associated with this MIME type (without the dot). Example:
cstm - Click “Add” to save the new MIME type.
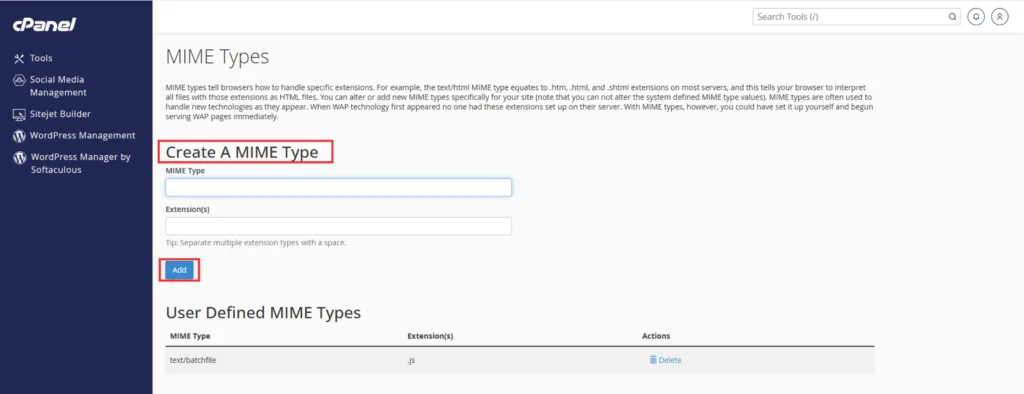
Step 4: Verify Existing MIME Types
After adding, check the list of existing MIME types to ensure your custom type appears correctly.
Troubleshooting Tips
- Double-Check MIME Values: Ensure you use the correct MIME type identifier.
- Remove Duplicates: Avoid adding redundant or conflicting MIME types.
- Clear Browser Cache: Sometimes browsers cache old MIME type responses.
- Consult Documentation: Refer to your application’s requirements for correct MIME values.
If you face issues, feel free to reach out to Hostrago Support.
Conclusion
How to configure custom MIME type in cPanel is an essential skill for any website administrator who wants greater control over file processing. Properly setting MIME types ensures optimal content delivery, prevents browser errors, and enhances overall user experience.
For more powerful and user-friendly hosting solutions with full cPanel access, explore Hostrago Hosting Plans. You can also find additional helpful tutorials on our Knowledge Base.