

How to configure custom Apache handlers in cPanel is a vital skill for anyone managing a website or server. Custom Apache handlers allow you to define how your server processes specific file types, offering better performance, compatibility, and flexibility for your web applications. In this guide, we’ll walk you through the entire process of setting up custom Apache handlers in cPanel with simple, step-by-step instructions.
In web hosting management, controlling how your server handles various file types is crucial for performance and flexibility. Apache handlers are powerful tools that determine how the Apache web server processes different types of files. With cPanel, configuring these custom Apache handlers becomes straightforward, even for users without deep technical expertise.
In this comprehensive guide, we’ll walk you through how to configure custom Apache handlers in cPanel, explain why they’re essential, and provide actionable steps to help you optimize your web server effortlessly.
What are Apache Handlers?
Apache handlers instruct the Apache web server on how to process certain file types or file extensions. By default, Apache comes with predefined handlers for standard file types like .php, .html, .cgi, etc.
However, there are situations where you may want to configure custom handlers to handle files differently depending on your application’s specific needs. This flexibility allows you to:
- Use custom scripts to process uncommon file extensions.
- Override default server behavior.
- Improve performance and compatibility for particular software stacks.
Benefits of Custom Apache Handlers
Before jumping into the configuration process, let’s explore why custom Apache handlers are important:
- Performance Optimization: Handle files more efficiently with specific processors.
- Increased Compatibility: Run scripts that require unique file handling.
- Enhanced Security: Control which files get processed by specific modules.
- Customization: Adapt your server to meet your unique application or website requirements.
How to Configure Custom Apache Handlers in cPanel
Setting up custom Apache handlers in cPanel is extremely user-friendly. Follow the steps below to configure them easily.
Step 1: Login to your cPanel Account
First, you need to log into your cPanel account provided by your hosting provider. If you are using Hostrago, simply go to Login in cPanel.
Step 2: Access “Apache Handlers” in cPanel
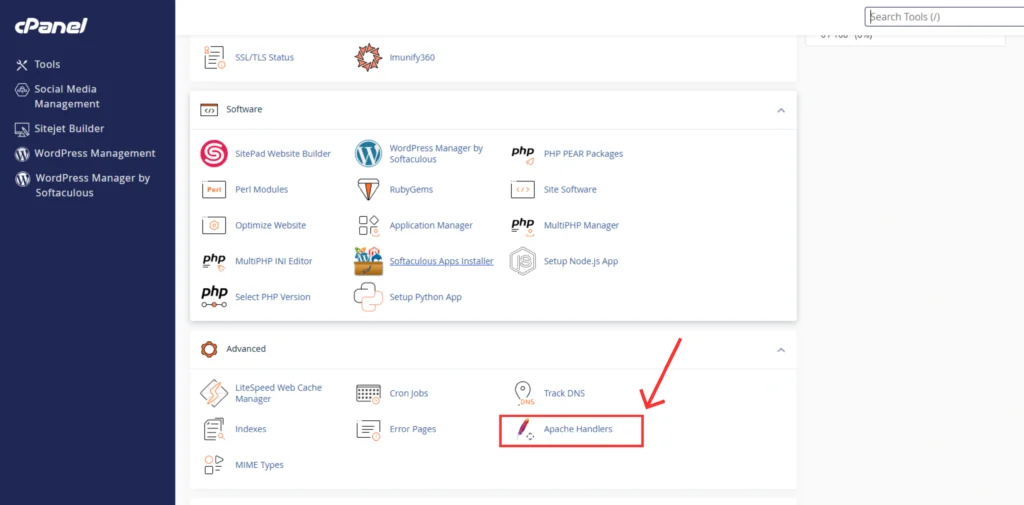
- Once logged in, scroll down to the “Advanced” section.
- Click on “Apache Handlers”.
Step 3: Add a New Apache Handler
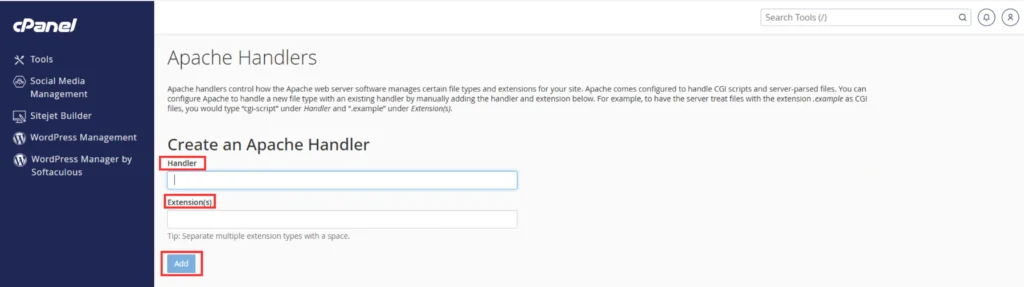
You will see a section labeled “Create an Apache Handler”.
- In the Handler field, enter the name of the handler you want to create. For example:
application/x-httpd-php. - In the Extension(s) field, enter the file extension(s) (without the dot) you want this handler to process. For example:
customphp. - Click “Add” to save the handler.
Step 4: Verify Existing Apache Handlers
Once added, your new custom Apache handler will appear in the list of existing handlers. Always double-check to ensure your handler is listed correctly.

Troubleshooting Tips
- Ensure there are no typos in handler names or extensions.
- Confirm that your hosting environment supports the handler you are configuring.
- If you are unsure which handler to assign, consult your application documentation or hosting provider.
For more troubleshooting or assistance, you can always contact Hostrago Support.
Final Thoughts
Configuring custom Apache handlers in cPanel empowers you to take full control over how your web server processes files. Whether you’re optimizing for performance, security, or compatibility, Apache handlers offer a simple yet effective way to customize your hosting environment.
If you’re looking for reliable web hosting that provides easy-to-use cPanel features, visit Hostrago Web Hosting Solutions. We also invite you to explore our extensive Knowledge Base for more helpful guides.