
Website crashes, accidental deletions, or malware attacks can ruin all your hard work in seconds. If your website files are ever compromised, knowing how to restore Home Directory backup in cPanel is essential. This powerful feature allows you to bring your website files, email data, and other crucial configurations back to life—quickly and efficiently—without the need for advanced technical skills.
In this complete guide, we’ll walk you through the how to restore Home Directory backup in cPanel, including how to upload your backup file, what happens during the restoration, and the best practices to follow. Whether you’re recovering from a mishap or migrating data, this process is a lifesaver for WordPress users, bloggers, and business owners alike. Plus, we’ll include screenshots and useful links to make this as beginner-friendly as possible.
What is a Home Directory Backup in cPanel?
A Home Directory Backup is a copy of all the files in your cPanel account’s main directory. This includes your website files, emails, configuration files, and more—excluding your databases.
Restoring from a Home Directory backup can help you:
- Recover from accidental file deletions
- Revert changes after a bad plugin or theme update
- Fix issues after malware removal
- Migrate files between hosting providers
Step-by-Step: How to Restore Home Directory Backup in cPanel
💡 Before You Begin
Make sure you already have a.tar.gzbackup file of your Home Directory. If not, you can create a backup or request one from your hosting provider.
1. Log in to Your cPanel Account
Visit your hosting provider’s cPanel URL and enter your credentials.
2. Navigate to the Backup Section
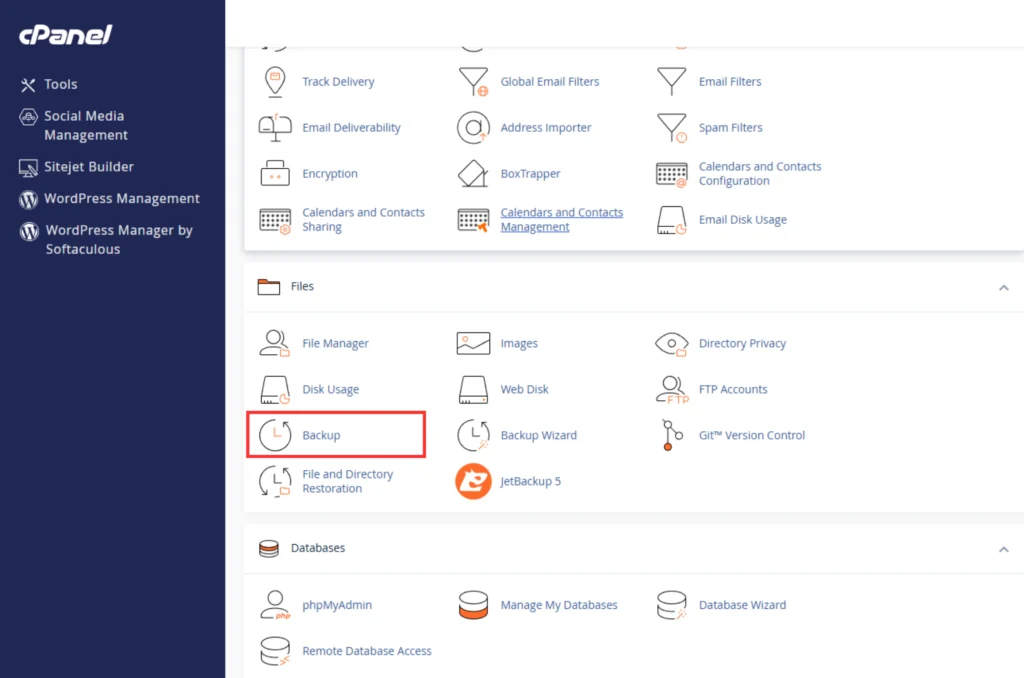
Once you’re inside the cPanel dashboard:
- Scroll down to the Files section.
- Click on the Backup icon (see screenshot below).
3. Locate the Restore Section
Inside the Backup interface, scroll down to the Partial Backups area.
Look for the section titled “Restore a Home Directory Backup.”
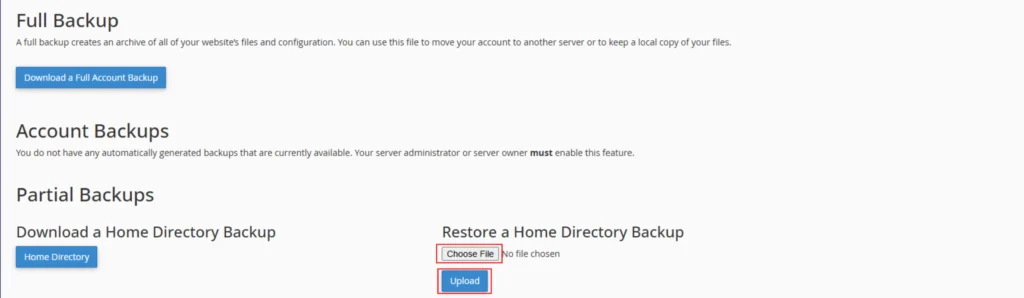
4. Upload Your Backup File
- Click Choose File and locate your
.tar.gzHome Directory backup from your local computer. - Once selected, click the Upload button to start the restoration process.
This will overwrite existing files in your account with the files from the backup. Depending on your file size and internet speed, this may take a few minutes.
What Happens Next?
Once the upload is complete, cPanel will automatically begin restoring your Home Directory files.
You’ll get a success message upon completion. If not, you may need to contact your hosting provider’s support team to check for permission issues or errors.
Tips for a Safe Backup Restoration Process
To ensure a smooth restoration:
- Backup your current Home Directory before restoring.
- Avoid multiple restorations within a short period.
- Keep a copy of the backup file on your local system or cloud storage.
Frequently Asked Questions (FAQs)
Q1: What file format should the Home Directory backup be in?
A: The file should be in .tar.gz format.
Q2: Can I restore emails with Home Directory backup?
A: Yes, email data stored in your Home Directory will also be restored.
Q3: Will restoring the Home Directory affect my databases?
A: No. Home Directory backups do not include databases. Use phpMyAdmin or Database Backup for that.
Q4: Is there any risk involved in restoring a backup?
A: If done properly, no. But always create a fresh backup of your current files before restoring.
Final Thoughts
how to restore Home Directory backup in cPanel is a lifesaver when things go wrong. With cPanel’s built-in tools, it only takes a few clicks to get your site back up and running.
Make it a habit to regularly download backups and consider setting up automated backup solutions for added peace of mind.
Need Help?
If you’re a HostraGo user and need help restoring backups or setting up automated solutions, reach out to our support team anytime.