Managing your code efficiently is essential for modern web development, and Git Version Control is a powerful tool to help with that. In this guide, we’ll walk you through the process of installing and updating projects How to install and update Using Git version perfectly tailored for users hosting their websites on HostraGo.
Whether you’re a developer deploying code to production or a beginner learning Git, follow this tutorial to streamline your version control process.
Step 1: Log in to Your cPanel via HostraGo
To get started, you need to access your cPanel dashboard. Follow these steps:
- Go to the HostraGo Knowledge Base.
- Look for the article titled How to Login in cPanel.
- Follow the instructions to log in using your cPanel username and password provided at the time of hosting setup.
After successful login, you will be redirected to your cPanel dashboard, where all your hosting tools and services are available.
🔐 Tip: If you’ve forgotten your login details, you can reset them from your HostraGo client portal or reach out to HostraGo Support.
Step 2: Locate Git Version Control
Once logged into cPanel, scroll down to the Files section and click on Git™ Version Control.
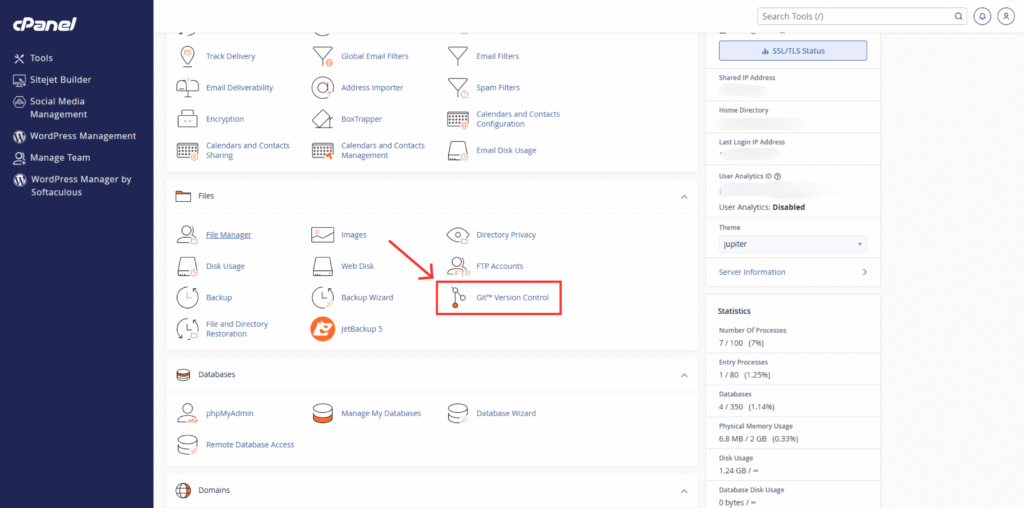
This will open the Git Version Control interface, where you can manage all your repositories.
Step 3: Enter Repository Information and Click Create
Once you’ve reached the “Git™ Version Control” interface in your cPanel, it’s time to configure the essential details for your repository. This step is crucial because it tells your server what repository to clone, where to store it, and how it will be referenced.
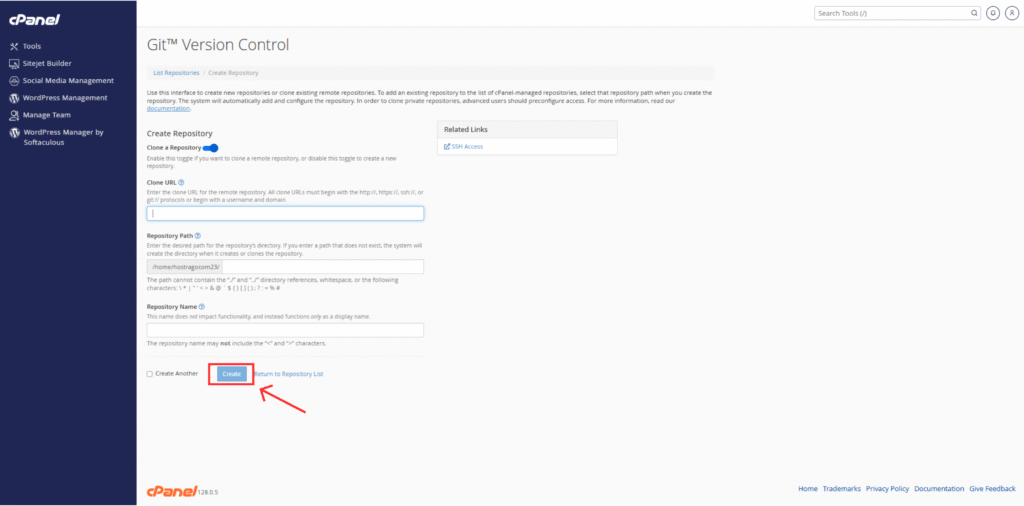
- Clone URL:
In this field, paste the URL of your remote Git repository. This could be a GitHub, GitLab, or Bitbucket repository. The URL must begin withhttp://,https://,ssh://, orgit://.
Example: arduinoCopyEdithttps://github.com/yourusername/your-repository.git - Repository Path:
This is the directory on your hosting server where your Git repo will be cloned. In this example, it’s set to: arduinoCopyEdit/home/hostragocom23/✅ Make sure the path does not contain special characters like\,*,!,{}, or spaces. The system will create this directory if it doesn’t already exist. - Repository Name:
This is simply a display name and does not affect functionality. Choose a descriptive name for easier reference, likeMyWebsiteRepo. - Click the “Create” Button:
Once all the fields are filled correctly, click the blue Create button. This will either:- Clone the repository to your server, or
- Set up a new empty repository if you didn’t provide a Clone URL.
🔁 You can also check the “Create Another” checkbox if you want to add multiple repositories without leaving the page.
Benefits of How to install and update Using Git version
- Version Control: Easily manage project versions and changes
- Collaboration: Work with teams more effectively
- Security: Keep production safe by tracking all changes
- One-click Updates: Deploy new changes quickly and safely
Common Errors & Troubleshooting
- Shell Access Required: If you see a warning about shell access, enable it via WHM or contact HostraGo support.
- Permission Denied: Double-check SSH keys and file permissions.
Final Thoughts
How to install and update Using Git version is a must-have for developers and site managers. With HostraGo’s user-friendly cPanel interface, it becomes even easier to manage your site efficiently.
If you’re looking for hosting that supports modern developer tools, check out our hosting plans.