
If you’re managing multiple domains under a single hosting account, knowing how to change Primary Domain in WHM becomes essential. The Primary Domain is the main identity of the cPanel account, used for FTP credentials, file paths, and email routing. Sometimes, due to business rebranding, ownership changes, or account restructuring, you may want to replace the existing Primary Domain with a new one — without affecting the rest of your data.
At HostraGo, we understand that tasks like changing the Primary Domain can feel technical. But don’t worry — this guide will show you how to perform it safely through WHM (Web Host Manager) using best practices. By the end, you’ll have a fully updated account without losing emails, subdomains, or databases.
When Should You Change a Primary Domain?
There are multiple reasons why a user might want to change their Primary Domain:
- Business rebranding or launching a new identity.
- Migrating website content to a new domain name.
- The original domain is no longer in use or expired.
- Optimizing SEO by switching to a better domain name.
However, it’s important to understand the implications of changing the Primary Domain. For example:
- The file path remains the same (public_html).
- Old domain emails may stop working unless redirected.
- Some internal application links may need to be updated.
How to Change Primary Domain in WHM?
Let’s walk you through the secure and proper steps to change Primary Domain in WHM:
Step 1: Log in to WHM
- Open your WHM panel:
https://yourserverip:2087 - Enter your root or reseller credentials.
- Once logged in, you’ll land on the WHM dashboard.
Step 2: Navigate to ‘List Accounts’
- In the search bar at the left panel, type List Accounts.
- Click on the result.
- A list of cPanel accounts will appear.

Step 3: Locate the Account
- Find the account you want to modify (associated with the old Primary Domain).
- On the right side of the row, click on the “+” icon to expand details.
- Click on the Modify Account button.

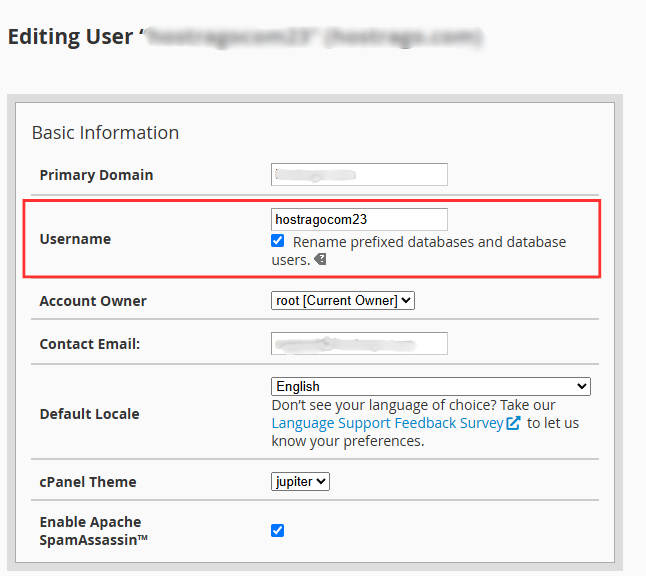
Step 4: Update the Primary Domain
- In the Modify Account section, find the Primary Domain field.
- Enter the new domain name.
- Ensure other details such as username, package, and IP remain unchanged (unless necessary).
Step 5: Save Changes
- Scroll to the bottom and click on the Save or Update button.
- WHM will now process your changes. This may take a few seconds.
Success! You’ve now changed the Primary Domain.
Important Considerations Before You Proceed
- Backup First: Always take a full backup of the website files and databases before making any changes.
- Email Configuration: Emails tied to the old domain may stop working. Set up new email accounts or redirects.
- SEO Impact: If the old domain had traffic, ensure proper redirection to preserve SEO rankings.
- SSL Certificates: Update your SSL for the new domain through AutoSSL or a third-party certificate provider.
Need Help?
Changing the Primary Domain is a sensitive action. If you face any issues or want an expert to handle it, HostraGo Support is available 24/7. Our skilled team will ensure a seamless domain transition with zero downtime.
Final Thoughts
Change Primary Domain in WHM is a straightforward process when done correctly. By following the above steps and precautions, you can efficiently switch domains while keeping your website and configurations intact. Remember to maintain DNS integrity, update CMS settings, and secure your new domain with SSL.
If you’re hosting with HostraGo, you get access to intuitive tools and expert support to handle changes like this with confidence. Not hosting with us yet? Check out our web hosting plans and get started today!