If you’re expanding your website structure, want a separate blog, or need a staging environment, learning how to create subdomain in cPanel can be extremely useful. A subdomain acts as an extension of your main domain and allows you to host different content under the same domain name like blog.yourdomain.com, store.yourdomain.com, or test.yourdomain.com.
Creating a subdomain is a great way to organize your website’s content or services without purchasing a new domain. At HostraGo, we empower our clients to easily create and manage subdomains through our powerful and intuitive cPanel hosting environment. In this step-by-step guide, you’ll learn exactly how to set it up in just a few minutes.
What is a Subdomain?
A subdomain is a subsection of your main domain that operates as a separate site or directory. It allows you to host:
- A blog (
blog.example.com) - A store (
shop.example.com) - A help desk (
support.example.com) - A development or staging site (
dev.example.com)
This is especially useful for businesses and developers looking to keep sections of their website isolated, test new features, or run multiple services without overlapping.
How to Create Subdomain in cPanel? (Step-by-Step)
Follow the instructions below to easily set up a subdomain via your cPanel account:
Step 1: Log in to Your cPanel Account
- Go to your cPanel login page. Typically, it looks like:
https://yourdomain.com/cpanel - Enter your username and password.
- You’ll be redirected to the cPanel dashboard.

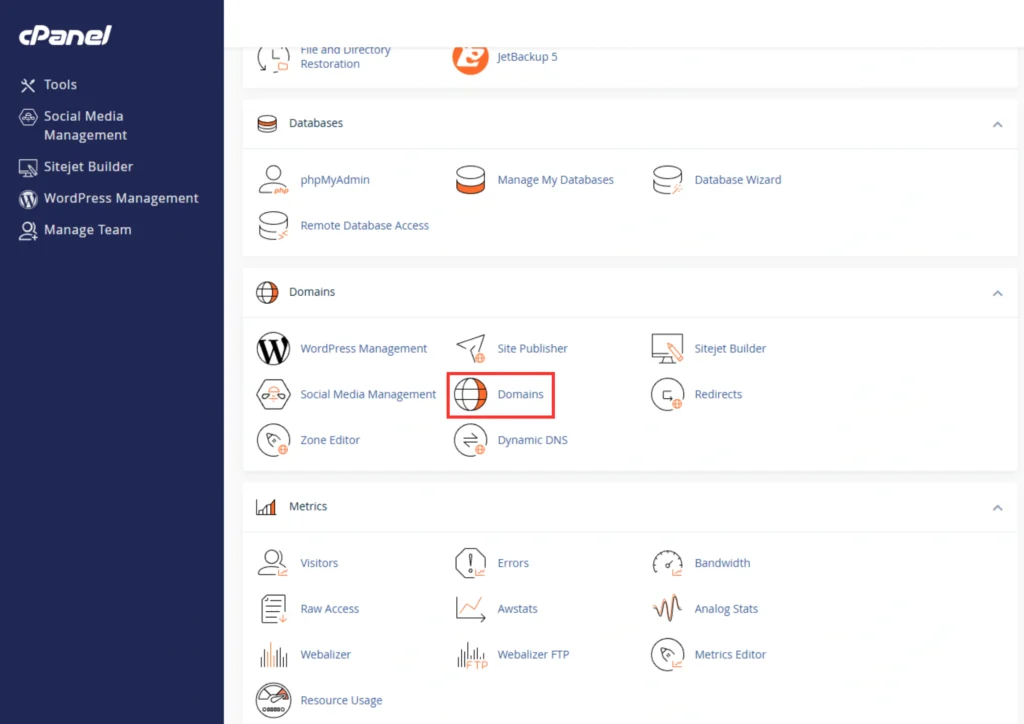
Step 2: Navigate to the ‘Domain’ Section
- Scroll down or search for the “Domain” tool in the Domains section.
- Click on the Domainicon.

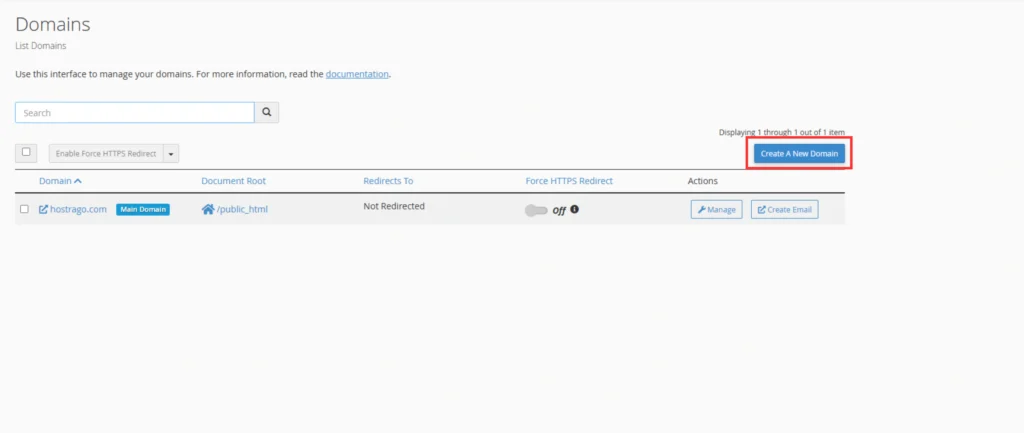
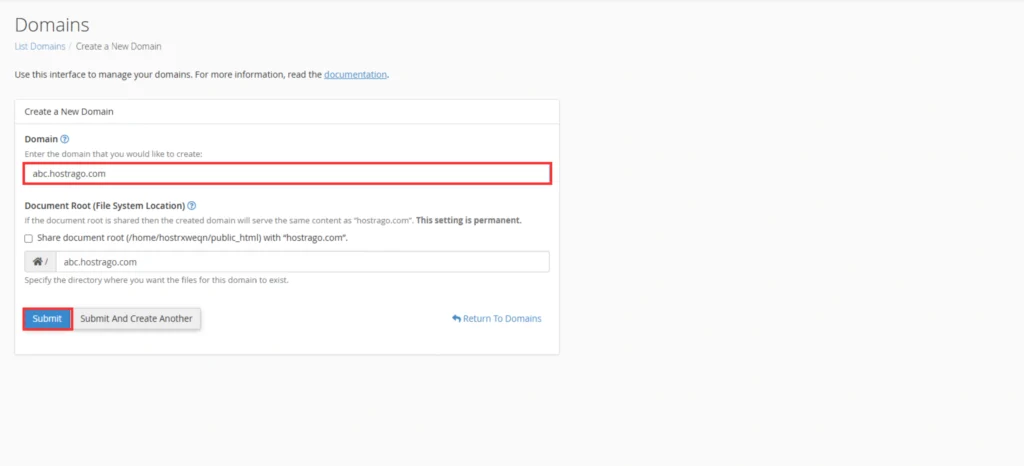
Step 3: Create the Subdomain
- In the domain field, enter the name of your subdomain (e.g.,
blog,store,test). - From the dropdown, select the main domain you want the subdomain attached to (e.g.,
example.com). - The Document Root will auto-fill — this is the directory in your file manager where your subdomain’s files will live (e.g.,
/public_html/blog). Tip: You can change this if you want a custom path. - Click Create.

✅ Done! You have now created a subdomain successfully in cPanel.
What Happens After Creating a Subdomain?
Once you create subdomain, it behaves like an independent site. You can:
- Upload files via File Manager or FTP
- Install a CMS like WordPress
- Set up redirects or SSL
- Create email accounts (if your plan supports it)
Note: DNS propagation may take a few minutes. If it’s not resolving right away, give it some time.
Expert Tips for Subdomain Management
- Always use HTTPS: Secure your subdomains with SSL.
- Avoid duplicate content: Google may penalize duplicate content across subdomains.
- Use for large features only: Don’t create subdomains for every page; it’s best suited for major site divisions.
- Keep backups: Subdomains are independent; ensure you back them up like your main domain.
Need help with backups? Learn How to Backup Website in cPanel (internal link)
Need Assistance?
If you’re having trouble creating or configuring your subdomain, our expert team at HostraGo is here to help 24/7. From DNS settings to CMS installations, we offer full support for all your hosting needs.
👉 Contact HostraGo Support
Or, explore our full-featured cPanel hosting that includes unlimited subdomains:
👉 View Hosting Plans
Final Thoughts
Knowing how to create subdomain in cPanel gives you more control and flexibility over your web presence. Whether you’re segmenting your blog, launching a new store, or building a test environment — subdomains are a practical, cost-effective solution.
At HostraGo, we ensure that managing domains and subdomains is as simple as a few clicks. Sign up today and take your web hosting experience to the next level with advanced cPanel features and blazing-fast support.


