When managing a hosting server via WHM, streamlining application installations is a top priority for web hosts. This is where cPAddons Site Software comes in. It allows you to easily install popular web applications like WordPress, phpBB, Joomla, and more directly through cPanel, helping your clients launch websites with ease.
If you’re looking to install cPAddons from your WHM dashboard, you’re in the right place. In this guide, we’ll walk you through each step to ensure you’re not only installing it correctly but also configuring it to provide the best user experience for your hosting clients. Installing cPAddons is a straightforward yet powerful way to empower your users with one-click application installs.
Before we dive into the step-by-step process, let’s understand what cPAddons are and why they are essential for a hosting environment.
What is cPAddons Site Software?
cPAddons Site Software is a feature in WHM/cPanel that allows server administrators to offer a variety of third-party applications—such as content management systems (CMS), forums, blogs, and more—to their users. Once installed and configured, cPanel users can deploy these apps with just a few clicks under the “Site Software” section of their dashboard.
For example, if a customer wants to install WordPress, they can do so without downloading files or creating databases manually. It simplifies the deployment process and enhances the hosting experience significantly.
Steps to Install cPAddons Site Software from WHM
Follow these steps to install cPAddons in WHM and enable site software options for your users:
Step 1: Log in to WHM
- Open your web browser and go to your WHM login page.
- Enter your root credentials to log in to the WHM dashboard.
Step 2: Access the cPAddons Site Software
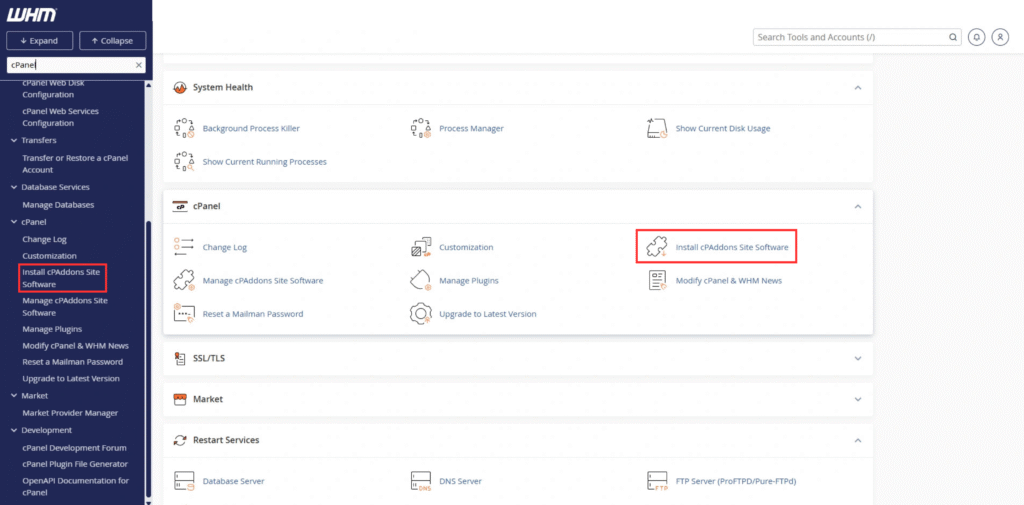
- In the WHM search bar, type “cPAddons”.
- Click on “Install cPAddons Site Software” from the search results.

Step 3: Select Applications to Install
You’ll now see a list of available cPAddons such as:
- WordPress
- Joomla
- phpBB
- Drupal
- Coppermine Photo Gallery
Step 4: Click “Update cPAddons Config”
Once you’ve selected the applications:
- Scroll to the bottom.
- Click “Update cPAddons Config” to save your selections.

This will install the selected site software on the server and make them available in your cPanel users’ accounts.
Step 5: Configure User Access (Optional)
If needed, go to “Feature Manager” in WHM:
- Select the feature list assigned to your hosting packages.
- Ensure “Site Software” is enabled for the respective feature list.
Managing cPAddons After Installation
Once installed, you can:
- Add or remove applications anytime from WHM.
- Update existing cPAddons from the same interface.
- Use scripts/upcp to keep cPAddons up to date automatically during nightly maintenance.
Benefits of Installing cPAddons Site Software
- Ease of Use: End-users can install apps without technical knowledge.
- Time-Saving: No need for manual script setup or database creation.
- Security: Applications are maintained by cPanel, ensuring frequent updates.
- Improved Customer Experience: Makes your hosting platform user-friendly and competitive.
Final Thoughts
Adding cPAddons Site Software is one of the simplest ways to enhance your cPanel offerings. Whether you’re a hosting provider, server admin, or a reseller, being able to install cPAddons in WHM gives your users a smoother, faster, and more professional web hosting experience.
At Hostrago, we empower our users by providing tutorials that simplify server management. If you’re looking for reliable and powerful web hosting in India, check out our shared hosting plans designed for all experience levels.
Have questions or need help? Drop your comments below or contact our 24/7 support!


