
When managing a live website, making changes directly to your production environment can be risky. Whether you’re adding a new plugin, editing design, or changing core code, one mistake can lead to downtime or data loss. That’s why it’s essential to create staging for your installations.
A staging environment acts as a clone of your live website, allowing you to test changes in a safe, isolated environment before pushing them live. This tutorial will guide you through how to create staging using the Softaculous installer in cPanel – a quick and effective way to test updates without affecting your actual site.
What is a Staging Environment?
A staging environment is a separate copy of your website that mirrors your live site. It allows developers and website administrators to test themes, plugins, updates, or custom code without disrupting the user experience of the production site.
Benefits of Creating a Staging Site:
- Avoid downtime due to unexpected issues.
- Test plugin/theme compatibility.
- Experiment with new features safely.
- Prevent broken layouts and performance issues on the live site.
Prerequisites to Create Staging in cPanel
Before proceeding with the staging setup, ensure you meet the following requirements:
- Your website is installed using Softaculous (usually via cPanel).
- You have sufficient disk space on your hosting account.
- You are hosting with a provider that supports Softaculous staging features (like Hostrago).
Step-by-Step Guide to Create Staging for Installations
Follow these steps to create a staging copy of your website:
Step 1: Log into cPanel
Start by logging into your cPanel account. You can do this by navigating to yourdomain.com/cpanel and entering your credentials.
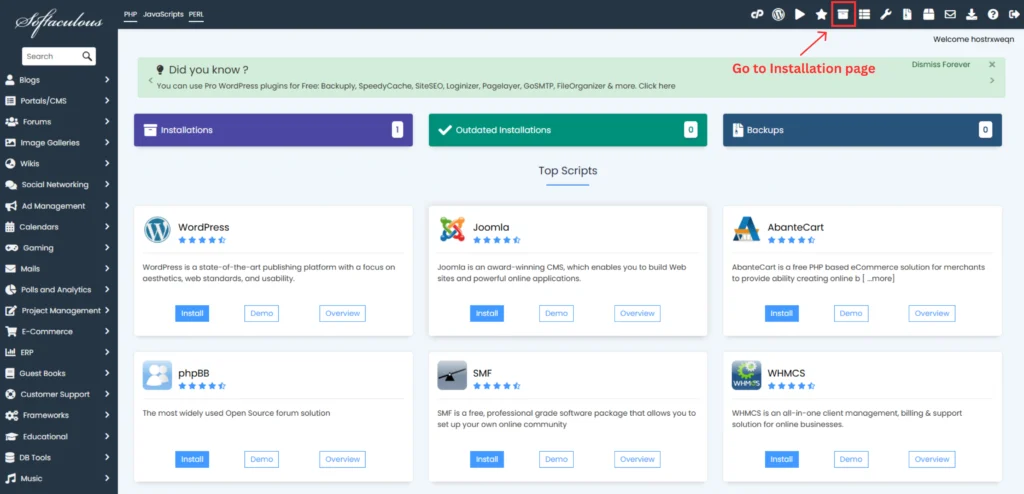
Step 2: Open Softaculous Apps Installer
Once inside cPanel, scroll down to the Software section and click on Softaculous Apps Installer.
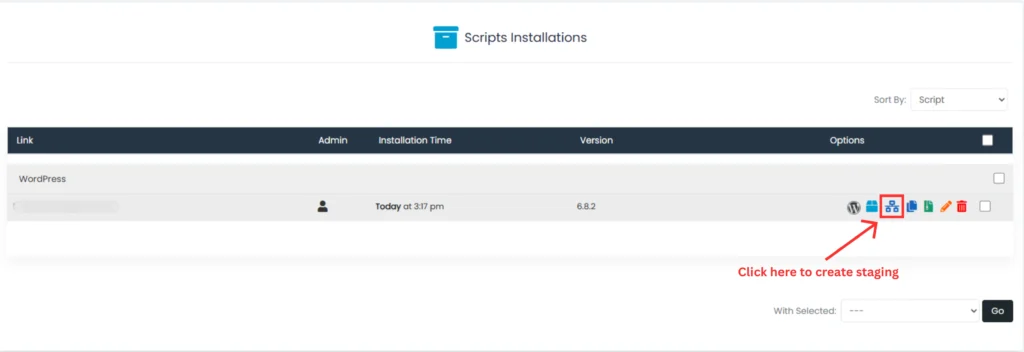
Step 3: Go to ‘Installations’
At the top right corner of the Softaculous dashboard, click on the “Installations” icon. This will list all scripts installed using Softaculous (e.g., WordPress, Joomla, etc.).
tep 4: Click the ‘Create Staging’ Icon
Find the installation you want to create a staging copy of. You’ll see a few icons next to it — click on the one labeled “Create Staging” (usually looks like two overlapping files or a ‘clone’ icon).
Step 5: Fill in the Staging Details
You will be redirected to a form to fill in the following:
- Choose Protocol: Select either
http://orhttps:// - Choose Domain: Choose the domain where staging will be created
- Directory: Set the directory where staging site should be placed (e.g.,
staging,dev, ortest)
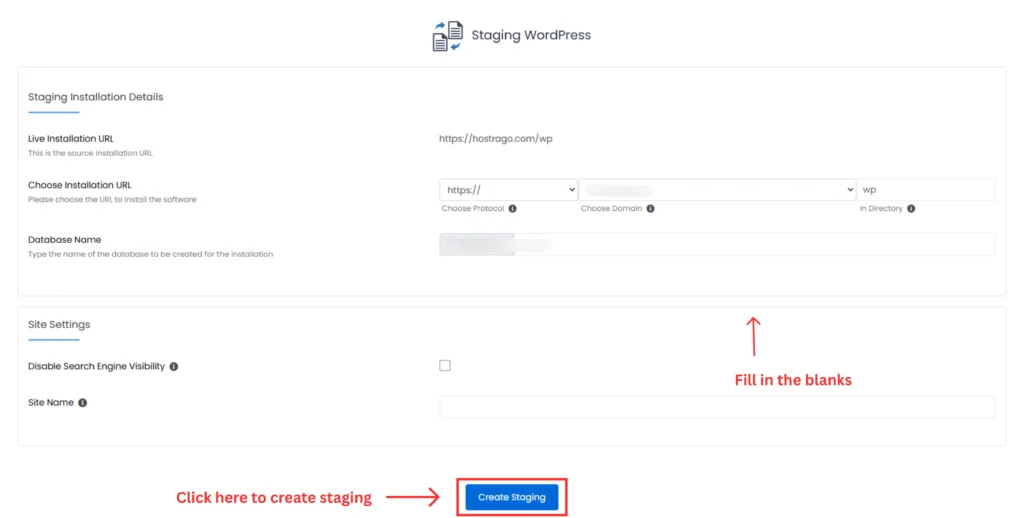
Click Create Staging once the form is filled.
What Happens After Creating Staging?
Once your staging environment is ready, you can:
- Test plugin/theme updates
- Apply code changes
- Check compatibility
- Run performance tests
After thoroughly testing, you can push the changes to live using the Push to Live option in Softaculous.
How to Push Staging Site to Live?
To push your tested staging version to your live site:
- Return to the Softaculous Installations section.
- Locate the staging installation.
- Click on the Push to Live button.
- Confirm your action and Softaculous will overwrite the live site with staging.
Related Articles
- How to Backup and Restore a Website in cPanel
- How to Manage AutoSSL in WHM/cPanel
- How to Troubleshoot a Hacked cPanel Account
Final Thoughts
Creating a staging environment is one of the smartest decisions you can make when managing a website. It gives you the freedom to innovate, test, and improve without risking your live website. With Softaculous, the entire process becomes just a few clicks away.
At Hostrago, we empower developers and businesses with tools like 1-click staging, automated backups, and lightning-fast web hosting services so your website always runs at its best.
Want to build smarter, safer websites?
👉 Get Hosting with Staging Support – starting at just ₹XX/month!
