
Are you tired of manually replying to every email when you’re unavailable or out of the office? With cPanel, you can easily configure autoresponders that automatically reply to incoming emails. Whether you’re a business owner or a website administrator, setting up autoresponders helps maintain professional communication without any manual effort.
In this detailed guide by Hostrago, we will walk you through everything you need to know to configure autoresponders in cPanel, step by step. It’s a simple but powerful feature that ensures no email goes unanswered. So, let’s explore how you can leverage this tool to improve your email response system.
What Is an Autoresponder in cPanel?
An autoresponder is an email tool available within cPanel that automatically sends pre-defined replies to incoming messages. You can use it to:
- Send vacation notifications
- Acknowledge receipt of customer queries
- Inform users about new support hours or updates
- Provide documentation links or next steps
Why Use Autoresponders?
Before you learn how to configure autoresponders in cPanel, it’s important to understand their key benefits:
- ✅ Improves customer satisfaction with instant replies
- ✅ Helps you stay responsive even when you’re offline
- ✅ Ensures professional communication
- ✅ Saves time on repetitive email responses
Want to learn more about cPanel tools? Check out our Ultimate Guide to cPanel for Beginners to explore essential features.
How to Configure Autoresponders in cPanel
Follow the below steps to set up autoresponders within your cPanel account:
Step 1: Login to cPanel
First, go to your domain’s cPanel login page. You can typically access it by typing:https://yourdomain.com/cpanel
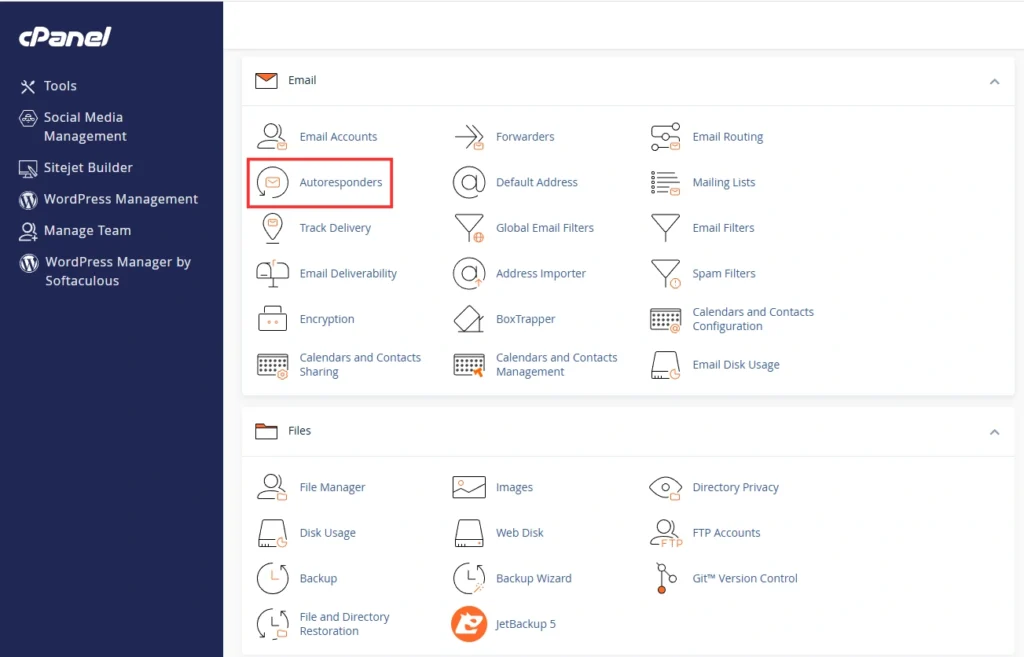
Step 2: Navigate to Autoresponders
Once inside cPanel:
- Scroll down to the Email section
- Click on Autoresponders
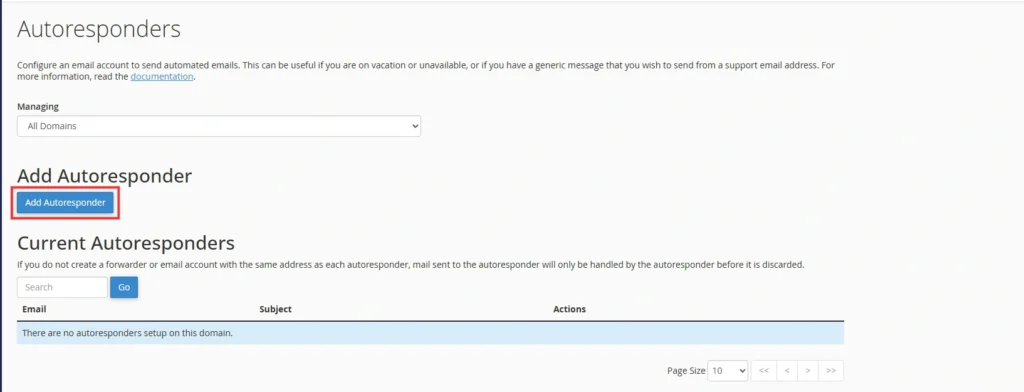
Step 3: Click “Add Autoresponder”
You’ll see a button labeled Add Autoresponder. Click on it to begin setting up your automatic reply.
Step 4: Configure Autoresponder Settings
You will now need to fill out several fields:
Step 4: Configure Autoresponder Settings
You will now need to fill out several fields:
- Character Set: Leave it as
utf-8(default) - Interval: Set the number of hours to wait before auto-replying to the same sender again
- Email: Enter the part before “@” for the email address you want to use
- Domain: Select your domain from the dropdown
- From: Name that appears in the reply
- Subject: Subject line of the auto-reply
- Body: The main message body. You can also use HTML formatting.
Example:
Hello,

Thank you for reaching out. We’ve received your message and will respond within 24 hours.

Best Regards,
Hostrago Support Team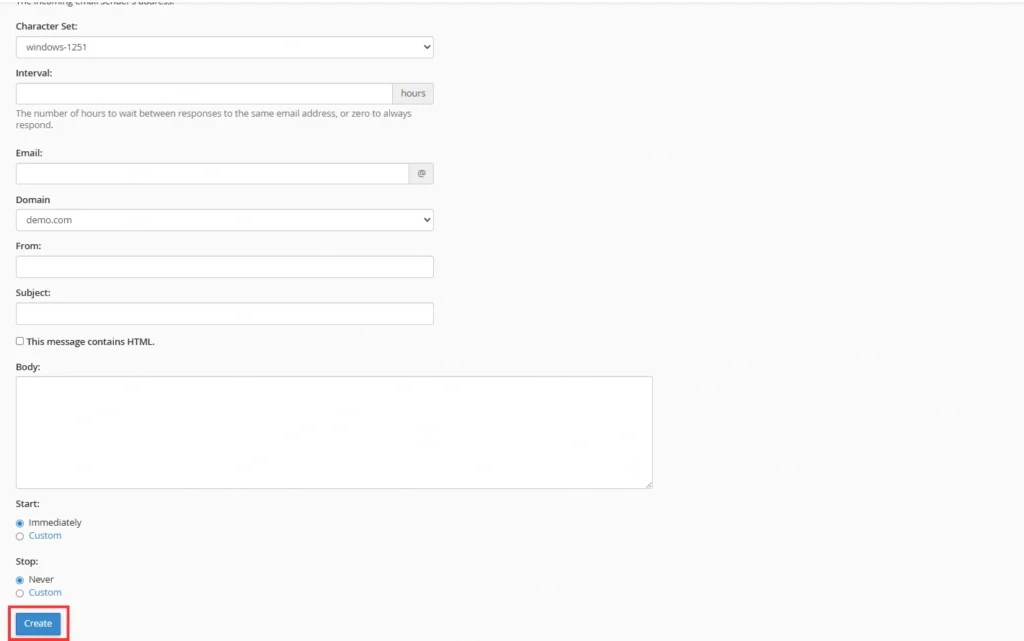
Step 5: Set Start and End Times
You can choose when the autoresponder should start and stop working. If it’s for vacation replies, select appropriate dates.
Step 6: Click “Create”
After entering all details, click the Create button. Your autoresponder is now active!
Managing and Editing Autoresponders
To manage or update existing autoresponders:
- Go back to the Autoresponders section
- Click Edit next to the email address
- Make changes and hit Modify
Troubleshooting Autoresponder Issues
If your autoresponder is not working:
- Double-check that the email account exists
- Ensure the correct start and end times
- Verify spam or junk filters aren’t blocking replies
- Reach out to Hostrago Support for quick help
Final Thoughts
Learning to configure autoresponders in cPanel is a must-have skill for anyone managing business communications. Whether it’s vacation messages or lead follow-ups, autoresponders help you stay in touch—even when you’re away.
At Hostrago, we make managing web hosting and email tools simple and stress-free. Need help with setting up cPanel features or email marketing? Contact our expert team today.