

If you’re running a WordPress website and want to better track user behavior, optimize marketing efforts, or simply manage all your tags in one place, learning how to add a Google Tag Manager is the perfect step forward.
add a Google Tag Manager (GTM) to WordPress allows you to integrate various tracking tools—like Google Analytics, Facebook Pixel, Hotjar, or conversion tracking—without manually editing your site’s code every time. In this comprehensive guide, we’ll show you how to integrate GTM into WordPress manually or using a plugin, step-by-step.
Whether you’re managing a blog, an eCommerce store, or a corporate website, integrating GTM empowers you to control your tags and scripts effortlessly—all from a single dashboard. At Hostrago, we recommend adding GTM as part of your basic WordPress setup to enhance SEO, marketing, and performance tracking.
What is Google Tag Manager?
Google Tag Manager is a free tag management tool offered by Google. It allows website owners to deploy and manage multiple marketing and analytics tags (snippets of code) on their website—without having to modify the site code directly.
Think of GTM as a container for all your tracking codes. Instead of embedding each one manually on your website, you just install GTM once and control everything from its interface. This improves flexibility and helps avoid breaking your site with code errors.
Benefits of Using Google Tag Manager:
- Centralized management for all tags and scripts
- No need to edit code for each tag
- Supports custom triggers and variables
- Enhanced performance and faster implementation
- Works seamlessly with WordPress and WooCommerce
Step-by-Step Guide: How to Add A Google Tag Manager to WordPress
Step 1: Create a Google Tag Manager Account
1. Go to Google Tag Manager
2. Google Tag Manager homepage will appear. Here, click on, Create Account.
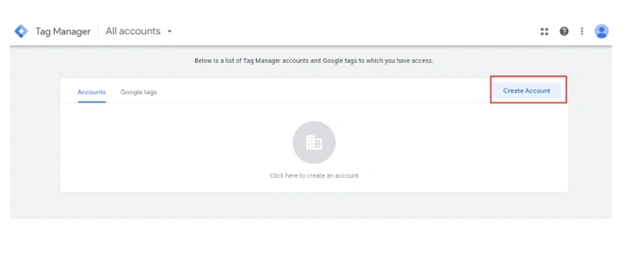
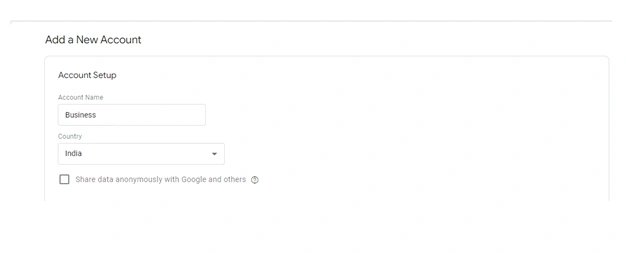
3. Click Create Account, then fill in:
- Account Name (e.g., Hostrago Website)
- Country: India (or your country)
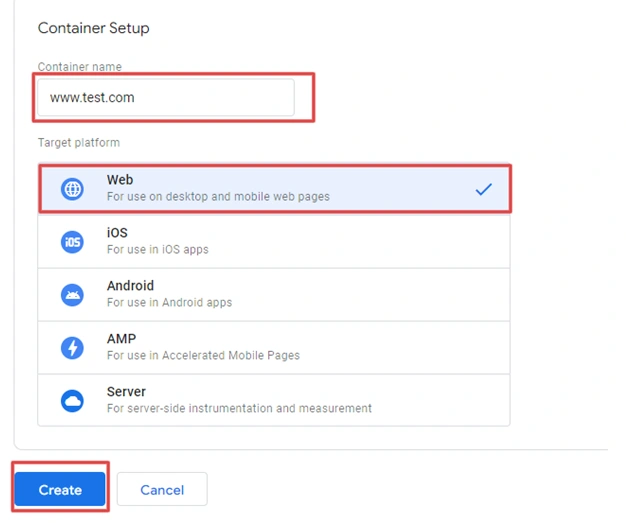
- Container Name: Use your domain name (e.g., hostrago.com)
- Target platform: Select Web
4. In the Container Setup section, enter your domain name and select web as the targeted platform. After filling all the required information click on “Create”
5. After clicking on the Create, you will head over to the TOS page. Thoroughly read all the information and tick the box “I also accept the Data Processing Terms as required by GDPR”

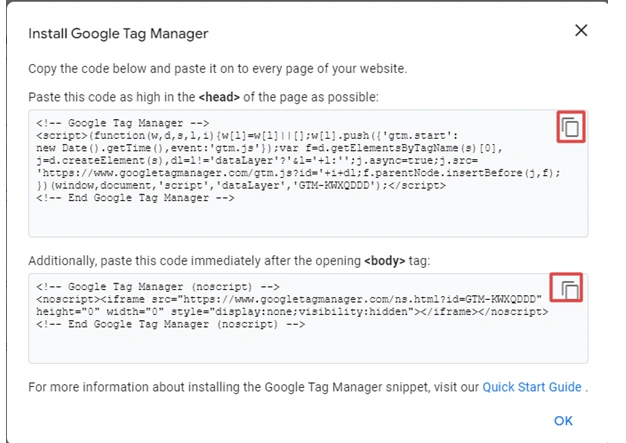
6. Once your account is created, you’ll see two pieces of code:
- One for the head section
- One for the body section
How to Verify Google Tag Manager Is Working
After adding the GTM code:
- Use the Google Tag Assistant Chrome Extension to check if GTM is firing correctly.
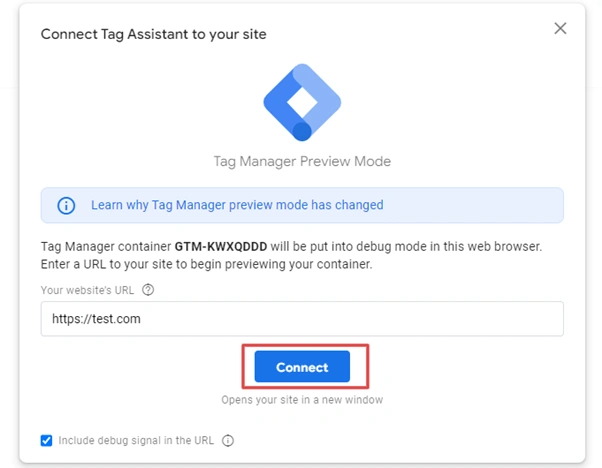
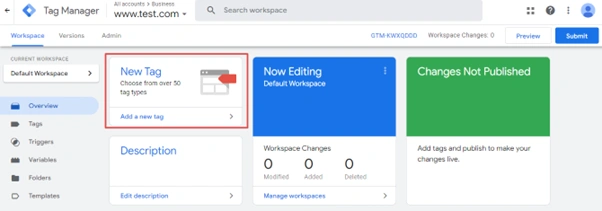
- Log into Google Tag Manager and click Preview mode.
- Visit your site; a debug panel should appear at the bottom of your screen.
What Can You Do with GTM?
Once installed, you can use Google Tag Manager to:
- Add Google Analytics 4 (GA4) tracking
- Add Facebook Pixel for retargeting
- Track form submissions, button clicks, scroll depth, or external link clicks
- Manage custom event tracking
- Deploy third-party marketing tools like Hotjar or LinkedIn Insights
Final Thoughts
add a Google Tag Manager to your WordPress website is one of the smartest decisions for anyone serious about tracking, SEO, and digital marketing. Whether you’re a beginner or a pro developer, GTM offers flexibility, speed, and control that other methods simply don’t match.
At Hostrago, we not only provide lightning-fast WordPress hosting but also help our clients set up analytics and GTM integration to boost online performance. If you’re still unsure or want help setting it up, reach out to our expert support team any time.
Want faster hosting with one-click GTM and Google Analytics integration? 🚀
👉 Check out Hostrago’s WordPress Hosting Plans
