At Hostrago, we always recommend clients install FFMPEG on their VPS or Dedicated Servers when running media-heavy applications. Follow the steps below to get FFMPEG up and running in your WHM server terminal.
If you are hosting video streaming services, running a media platform, or developing applications that rely on multimedia processing, you’ll need FFMPEG installed on your WHM/cPanel server. Without FFMPEG, tasks like video conversion, audio streaming, and thumbnail generation become almost impossible on a server level.
In this guide, we’ll show you how to install FFMPEG easily on your cPanel/WHM server, ensuring your environment is ready to process audio and video files smoothly.
To Install FFMPEG
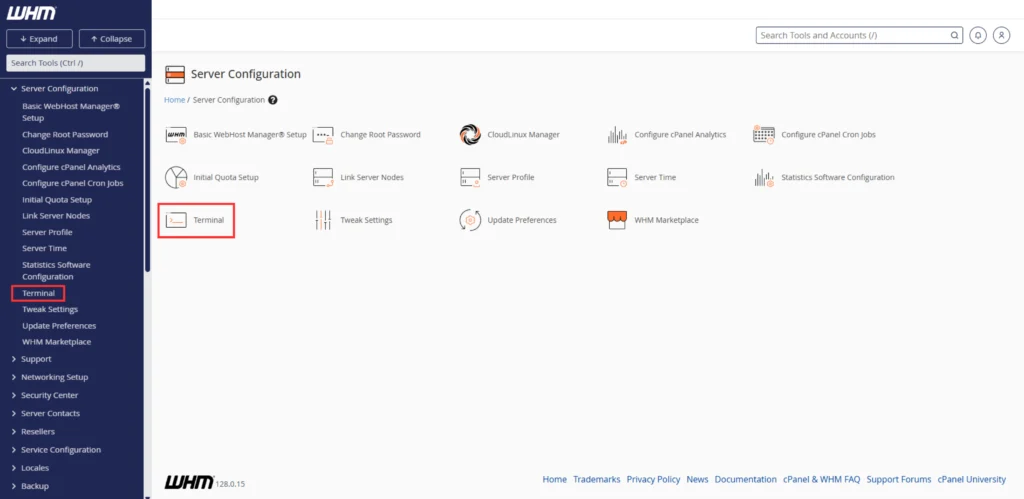
1. Log in to your root account of the WHM panel.
2. Select the Server Configuration option from the navigation menu.
3. Click on Terminal.

Step 1: Install the EPEL Repository
To begin with, you need to install the EPEL (Extra Packages for Enterprise Linux) repository. This repo provides additional packages that aren’t included in the default CentOS repository.
Run this command:
yum install epel-release
What if the command fails?
In rare cases, you might encounter the error:
No package epel-release available
If this happens, manually download and install the EPEL release package using:
wget https://dl.fedoraproject.org/pub/epel/epel-release-latest-7.noarch.rpm
rpm -ivh epel-release-latest-7.noarch.rpm
This will ensure that the EPEL repository is successfully installed on your server.
Step 2: Install the NUX Desktop Repository
Once the EPEL repository is installed, the next step is to install the NUX desktop repository. This repository provides multimedia packages, including FFMPEG.
Run the following command:
rpm -Uvh http://li.nux.ro/download/nux/dextop/el7/x86_64/nux-dextop-release-0-5.el7.nux.noarch.rpm
This step is crucial as it prepares your server to access and install the latest FFMPEG packages.
Step 3: Install FFMPEG
With the EPEL and NUX repositories in place, your server is now ready to install FFMPEG.
Run this command to install FFMPEG and its development libraries:
yum -y install ffmpeg ffmpeg-devel
This command will download and install FFMPEG along with all necessary dependencies.
Step 4: Verify the FFMPEG Installation
Once the installation completes, you can verify that FFMPEG is installed and working correctly.
Simply enter:
ffmpeg -version
If FFMPEG is installed successfully, this command will return the installed FFMPEG version along with configuration details.
Conclusion
By following these simple steps, you can easily install FFMPEG on a WHM/cPanel server. This setup is especially useful if you’re managing applications involving:
- Video streaming and conversion
- Audio encoding and processing
- Thumbnail generation for videos
- Media file format conversions
If you’re using a Hostrago VPS or Dedicated Server, installing FFMPEG is a breeze with root access. For those looking for a managed solution or facing installation challenges, feel free to contact the Hostrago Support Team.
Conclusion
Installing FFMPEG on a WHM/cPanel server is essential for anyone dealing with multimedia content. Whether it’s for video conversion, streaming, or audio processing, FFMPEG provides the tools needed to handle such tasks efficiently.
If you’re hosting with Hostrago, our servers are optimized for multimedia applications, and our team can help you set up FFMPEG smoothly. Visit our VPS Hosting Plans if you want more power and flexibility for media applications.


