
Broken links and deleted pages can lead visitors to the dreaded 404 error page — a dead end that may drive users away from your site. But did you know that you can How to Set a Custom 404 Page With .htaccess to enhance user experience and retain engagement?
In this comprehensive guide, you’ll learn exactly How to Set a Custom 404 Page With .htaccess, complete with HTML code, step-by-step instructions, and essential best practices. Whether you’re managing a blog, portfolio, or wordpress website hosted on HostraGo, this simple tweak can drastically improve your site’s professionalism and usability.
👉 Related Read: How to Access Webmail Through cPanel
What is a 404 Page?
A 404 error page is shown when a user tries to access a URL that doesn’t exist on your server. This could be due to a broken link, moved content, or simply a typo in the URL.
A custom 404 page gives you the chance to guide users back to your website, rather than letting them leave frustrated.
Why Create a Custom 404 Page?
- Improves user experience by guiding users to useful content
- Reinforces your brand identity with a professional design
- Reduces bounce rate by offering relevant links
- Helps SEO when combined with a good site structure
Steps Of How to Set a Custom 404 Page With .htaccess
Follow the steps below to configure a custom 404 error page using the .htaccess file.
Step 1: Upload or Create Your 404 Page
First, create your custom error page using HTML or PHP and save it as 404.html or 404.php.
Then:
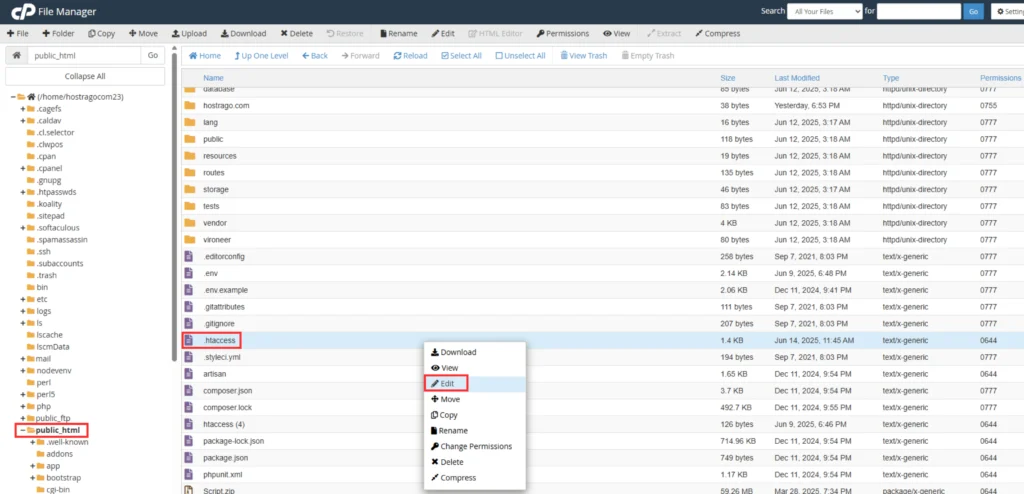
- Log into cPanel
- Go to File Manager

- Navigate to the public_html directory
- Upload the custom 404 file here
Step 2: Open or Create the .htaccess File
In the same public_html directory:
- Find the file named
.htaccess - If it doesn’t exist, click +File to create one
Right-click the .htaccess file and select Edit
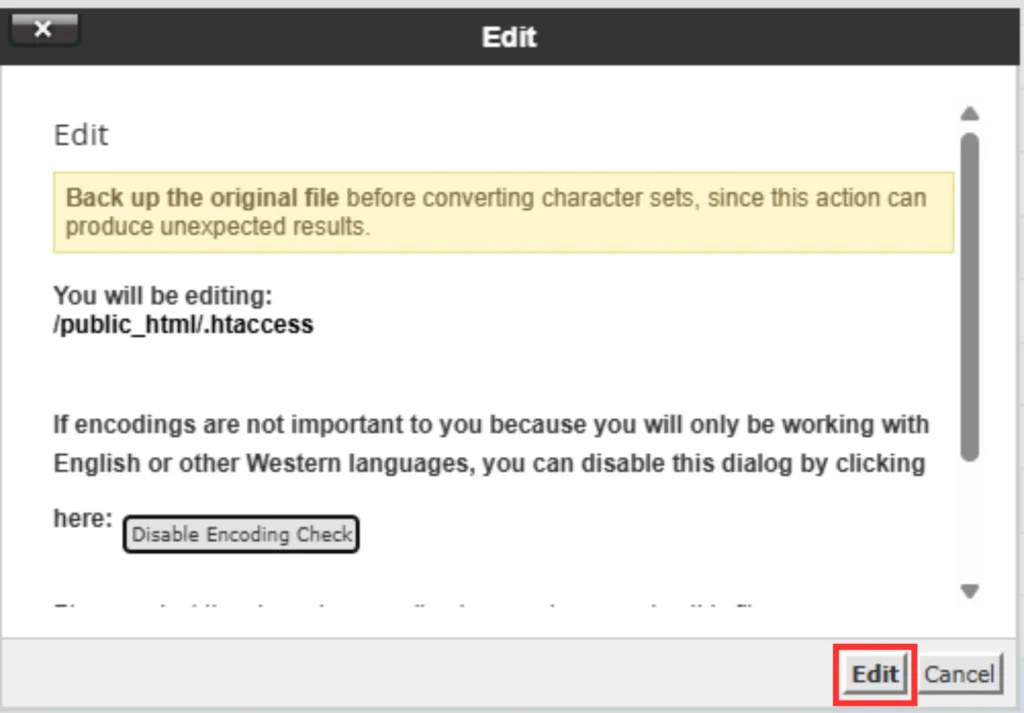
Step 3: Add ErrorDocument Rule
Add the following line to the top or bottom of the file:
ErrorDocument 404 /404.html
Replace 404.html with the correct filename and path if your file is located in a subfolder (e.g. /errors/404.html).
Step 4: Save and Test
After saving the changes:
- Visit a non-existing URL on your domain (e.g.,
yourdomain.com/fakepage) - Your custom 404 page should appear instead of the default error page

Here’s a basic example of a clean and user-friendly 404 page:
<!DOCTYPE html>
<html lang="en">
<head>
  <meta charset="UTF-8">
  <title>404 - Page Not Found</title>
  <style>
    body { background-color: #f8f8f8; font-family: Arial; text-align: center; padding-top: 100px; }
    h1 { font-size: 72px; color: #ff4a4a; }
    p { font-size: 20px; }
    a { text-decoration: none; color: #0066cc; }
  </style>
</head>
<body>
  <h1>404</h1>
  <p>Oops! The page you're looking for doesn't exist.</p>
  <p><a href="https://www.hostrago.com">Return to Home Page</a></p>
</body>
</html>
Final Thoughts
How to Set a Custom 404 Page With .htaccess is a simple yet powerful step to improving user experience, reducing bounce rates, and giving your brand a more professional look. Whether you’re running a personal blog or a large business website hosted on HostraGo, this enhancement is highly recommended.