Email communication is crucial for any business or personal website. However, sometimes, email users encounter errors that disrupt this communication. One of the common issues faced in cPanel is the ‘550 Sender Verify Failed’ error. This error usually occurs when the email server is unable to verify the sender’s address before delivering the message.
In this guide, we will walk you through how to fix the ‘550 Sender Verify Failed’ error in cPanel, with simple, step-by-step instructions that are easy to follow even for beginners.
What is the ‘550 Sender Verify Failed’ Error?
The 550 Sender Verify Failed error usually means that your server attempted to validate the sender’s email address but was unsuccessful. Most of the time, this happens when:
- The sender’s email account does not exist.
- There is an incorrect email configuration.
- There is a problem with email routing or MX records.
- The domain lacks proper DNS settings.
Fixing this error is essential to ensure that your email system works smoothly and that you don’t miss any important communication.
Common Reasons Behind This Error
Before we jump into the solution, let’s understand the potential causes:
- Incorrect MX Records: Misconfigured MX records can lead to verification failures.
- Local Mail Exchanger Settings: Your cPanel might be trying to verify a local email address when it should be verifying an external one.
- Non-existing Email Accounts: Attempting to send emails to invalid or non-existing addresses.
- Spam Protection Settings: Strict spam filters or sender verification checks.
Step-by-Step Guide to How to Fix: ‘550 Sender Verify Failed’ Error in cPanel
Follow these steps carefully to resolve the issue:
Step 1: Login to Your cPanel Account
- Open your browser and navigate to your cPanel login page.
- Enter your username and password.
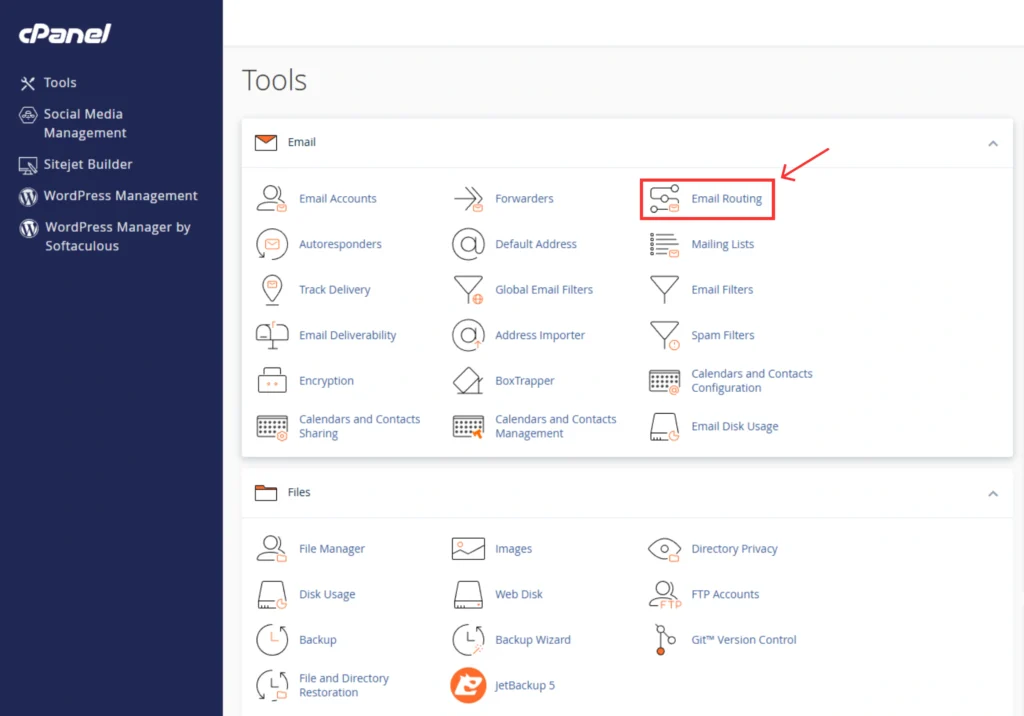
Step 2: Navigate to the “Email Routing” Option
Once you’re inside your cPanel dashboard:
- Scroll down to the Email section.
- Click on Email Routing.
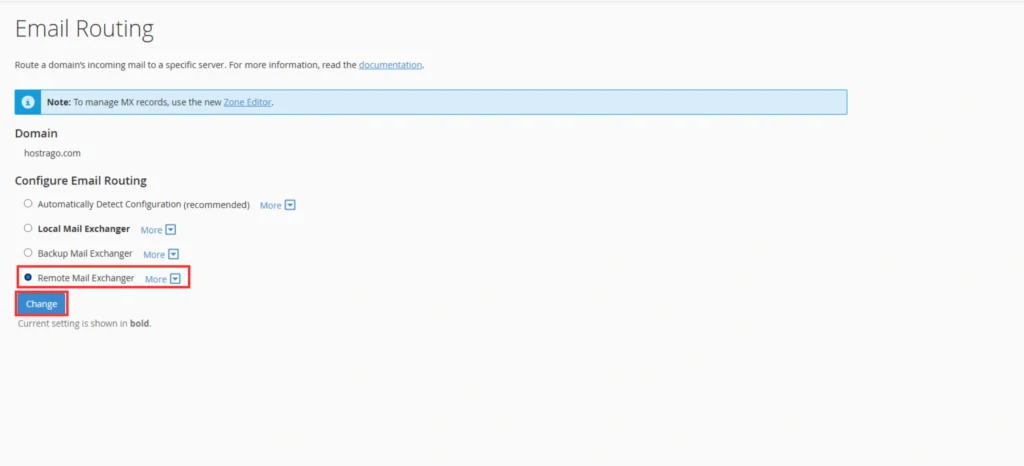
Step 3: Select the Correct Email Routing Method
Now, you will see the configuration screen for Email Routing.
- Select the domain for which you’re experiencing the issue.
- You will see four options:
- Automatically Detect Configuration (recommended)
- Local Mail Exchanger
- Backup Mail Exchanger
- Remote Mail Exchanger
- In most cases of 550 Sender Verify Failed, the issue lies with incorrect routing selection.
Step 4: Choose “Remote Mail Exchanger” or Correct Setting
- If your email service is hosted externally (e.g., with Google Workspace, Microsoft 365, Zoho Mail, etc.), select Remote Mail Exchanger.
- If your emails are hosted locally on the same server, choose Local Mail Exchanger.
- Click on the Change button to save the settings.
Step 5: Verify MX Records
- Go back to your Zone Editor under the Domains section.
- Make sure your MX records point correctly to your mail provider.
- If not, update the records according to your email host’s documentation.
Alternative Solutions
If the issue persists after checking the above:
- Verify that the sender’s email address exists and is spelled correctly.
- Contact your hosting provider for server-side restrictions or additional debugging.
- Check for any server-wide spam protection settings that may be blocking email verification.
Final Thoughts
Facing the ‘550 Sender Verify Failed’ error can be frustrating, especially when you depend on smooth email communication for your business. Fortunately, with a few simple tweaks in your cPanel’s Email Routing settings and DNS configurations, you can quickly resolve the issue and ensure your emails are delivered successfully.
If you’re still experiencing issues, feel free to reach out to HostraGo Support for expert assistance.